Drum brakes use friction-lined brake shoes inside of the brake drum to slow a vehicle down, as opposed to disc brakes which use brake pads to grab onto a brake rotor.
Drum brakes are a type of braking system used in cars for many years. They work by using brake shoes, which are like special shoes for the car's wheels that rotate when the vehicle is moving.
These shoes have a lining made of friction material that creates the necessary resistance to slow down or stop the car.
The brake shoes are pushed against the brake drum by small pistons, which act as helpers to increase the braking force and slow down the car more effectively.
While drum brakes have been largely replaced by disc brakes in modern cars, they remain reliable and effective for some vehicles.
Here are some of the key differences between Drum Brakes and Disc Brakes:
- Drum brakes are on the vehicle’s rear axle, while disc brakes are typically located on the vehicle’s rear and front axles
- Drum brakes have a longer service life than disc brakes
- Drum brakes have a lower manufacturing cost
- Drum brakes can function as the parking brake for a vehicle
- Disc brakes have better straight-ahead braking power
- Disc brakes have better heat dissipation
Key Takeaways:
|

7 Steps to Replace Your Drum Brakes
1. Ensure Safety and Prep Your Car
Drum brake replacement can release hazardous materials into the air, especially if it is an old vehicle. You must wear a mask and work in a ventilated area while ensuring that no one else approaches the vehicle during the replacement.
You should prep your vehicle by:
- Removing the wheel covers
- Loosening the lug nuts
- Using stands and a jack to raise and support the vehicle
- Disengaging the parking brake to remove the brake drum
2. Remove and Inspect the Brake Drum
You should remove the wheel and the brake drum to get the brake shoes. Some brake drums on front-wheel-drive cars have a hub with traditional cone bearings in it.
These hubs need to be removed altogether, including the spindle nut, also known as an axle nut, which is used to attach a wheel to an axle.
Steps to remove the brake drum:
- Start by removing any drum retaining screws or clips and slide off the drum.
- Next, remove the rubber access port on the backing plate and turn the star wheel on the drum adjuster. Brake drums are usually removed by moving them back and forth while pulling them away from the hub. You may need to apply a penetrant, use a hammer, or cut off the drum if it gets stuck on the axle hub.
Clean and Inspect the brakes:
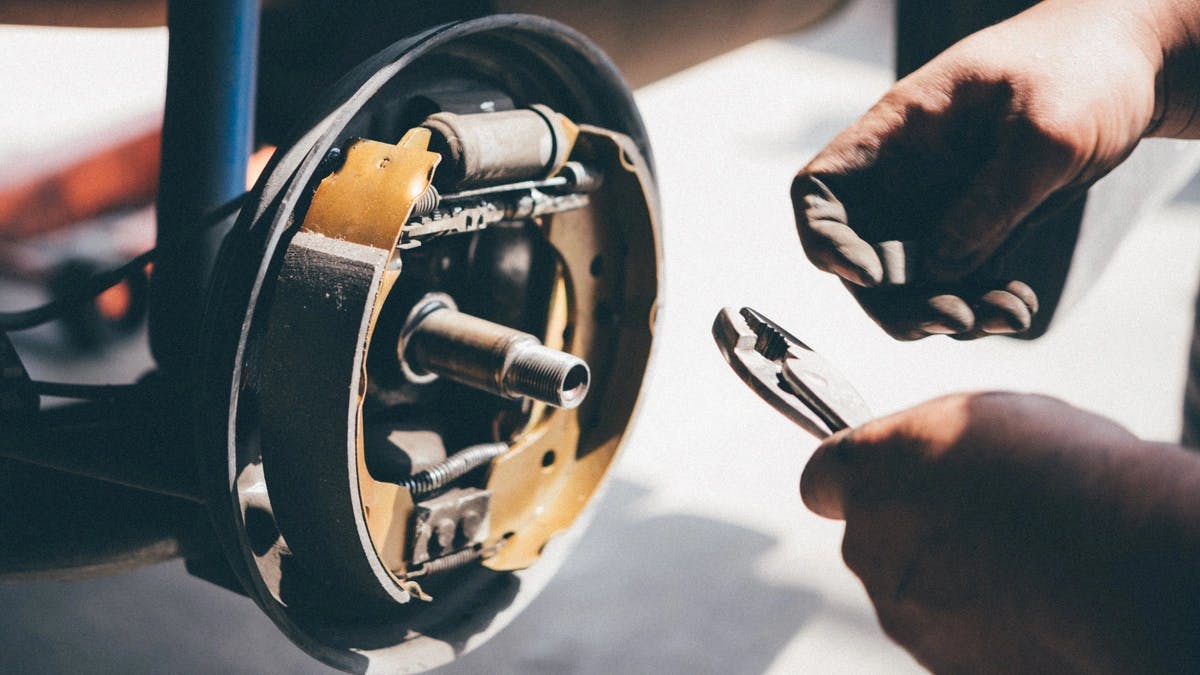
- Once the drum brake is removed, you may see the inner workings of the drum brake assembly such as the shoes, springs, and wheel cylinder.
- Before proceeding to disassemble the parts, spray the brake cleaner thoroughly on the entire assembly.
- Now it’s time to measure and inspect the brake components such as brake shoes, and brake drums.
- Use a digital micrometer set to read in inches for inspecting the brake shoes. If the thickness of the brake shoes is less than 1/16th of an inch, the brake shoes should be replaced.
- Next, go for the brake drums for any scoring, cracking, or grooving.
- Also, inspect the wheel cylinders for any leaks of brake fluid. If so, then the wheel cylinders need to be replaced.
3. Disassemble the Brake Drum and Remove the Brake Shoes
- Using a needle nose plier pull the shoe-retaining springs to remove the brake shoes. Some vehicles use multiple sets of springs to tension the brake shoes. In that case, remove the topmost spring, which will loosen the overall tension and make the other springs easier to remove.
- Also, some brake shoes are tensioned with pins and washers in the place of springs, which can also be pulled using a needle nose plier.
- After the springs, washers and pins are pulled out, remove the brake shoes.
4. Remove the Parking Brake Cable Retainer Clip
- Using a flathead screwdriver or pliers, remove the parking brake cable retainer clip.
5. Clean and Re-install the Brake Shoes and Components
- Clean the backing plate with brake cleaner.
- Slide the pin through the new shoe and reinstall the parking brake retaining clip.
- Now, install the adjusting screw assembly and screw spring.
- Re-install the new brake shoes onto the hub, and secure them with new pins and washers.
- Reinstall the tensioning springs to secure the brake shoe.
6. Install the New Brake Drum
- Prepare the new drum brake as an initial step while installing the new drum brake. This includes cleaning the drums using a cleaning spray as some drums have thin oil-coated onto them.
- Once the drum is clean, slip it over the brake shoes and install it onto the hub. In case you aren't able to slide the drum, try adjusting the brake shoes and then fit the drum again. You can adjust the brake shoes by turning the adjuster, or by using an adjuster tool.
- Adjust one increment at a time until the drum slides over the brake shoes and onto the hub properly without excessive resistance.
- By now, the drum brake must be fully reassembled. Make sure the brake drum is properly fitted as it may cause problems if not attached properly.
7. Install the Wheel and Tire
Now it's time to install the wheel and tire.
- Now spin the wheel and adjust it through the backing plate until the brake shoes connect with the drum brake.
- Tighten the wheel and tire back in place using lug nuts.
What Are the Signs That Indicate the Need for a Drum Brake Replacement?
The efficiency of a vehicle’s braking system is significant for on-road safety. So, you must pay close attention to any warning signs to see if there is a problem with the vehicle's drum brakes.
Mentioned below are the major signs that indicate the need for a drum brake replacement.
-
Noises From the Vehicle
Noise from the vehicle's rear end while braking is a vital sign of bad drum brakes. The vehicle may also witness a reduced braking performance.
-
Loose Parking Brakes
If your vehicle has loose parking brakes that are not engaging, it can indicate a major issue with the drum brakes.
-
Trouble Stopping the Vehicle
When the drum brakes start to wear, the stopping time of a vehicle will increase and will not halt quickly.
-
Brake Pedal Vibration
You may notice performance issues with the brake pedal if the drum brakes are not functioning properly.
If you are looking for a professional replacement for your drum brakes, visit NuBrakes and bid goodbye to your braking system woes.
You can choose a replacement date and time for your brakes and leave it with the technicians to ensure your vehicle is ready to hit the roads.
References
- https://mechanicbase.com/brakes/bad-brake-drums-symptoms/
- https://www.autozone.com/diy/brakes/how-to-change-drum-brakes